A WHISPER (WSPR) ADVENTURE and ESP_WSPR
While researching digital communication systems with my dear friend Google in the summer of 2019, I came across a very interesting amateur digital communication protocol called WSPR.
The most important feature of this protocol was that it could reach very far with very low power according to amateur communication standards. While doing this, it was working one-way, that is, only as a transmitter, and with the special software used by the receiving station, the characteristics of the received signal and the call code of the sending station were reached to a server over the internet and stored in the database there.
What’s more, when you query with your call code over the internet address of the server where the data is stored, you can see which stations and how many thousand kilometers away the signal you sent was received, both as a table and on a map.
Frankly, it was quite interesting to me that such weak digital signals could travel this far, and my whisper (WSPR) adventure began.
First of all, I thought I’d find out what this whisper protocol is. WSPR is a protocol consisting of the initials of the words Weak Signal Propagation Reporter in English. It’s called WSPR for short. WSPR is also known as a whisper transmitter among amateurs because of its low power, as it resembles the English word “whisper” meaning to whisper.
Well, what good is this WSPR? And what is it?
Similar protocols from the same family as WSPR, FT8, JT65 etc. A digital communication protocol designed to reach far with very weak signals such as The father of all these protocols, Joe Taylor, is an American amateur radio operator named K1JT.
Joe Taylor is an astrophysicist and Nobel Prize-winning academic at Princeton University.
When we ask what is the use of WSPR, the simplest answer is the most efficient way to see how the propagation in a certain band is at a certain hour. Another purpose of use is one of the most effective ways to test the spread and efficiency of your antenna in the selected band.
Let’s say you installed a new 20 meters/14 mhz antenna. Everything you have tested with the antenna analyzer works fine. But you haven’t done QSO yet, so the antenna class has not passed. You also have a 14 mhz 10 mw WSPR transmitter. I can hear you laughing when you hear 10 mw. This is a very normal reaction.
Anyway, you connected this awesome 10 mW output power to your newly installed antenna and your WSPR transmitter started working. Let’s say it sent every 2 minutes for 24 hours. After 24 hours, you turned off the WSPR transmitter and when you enter one of the addresses www.wspr.vk7jj.com or www.wsprnet.org , select your band on the parameter screen, enter the 20 meter band and your call sign, and see the surprise waiting for you, your smile will turn into a serious joy when you hear 10 mw power. Reaching a distance of 1500 to 2000 km with 10 mW output power makes every amateur radio operator happy. Of course, this will also be an important record that your antenna is working efficiently.
Of course, the opposite is also possible! Your antenna may also be inefficient or out of tune. In this case, the distances you reach and the amateur radios who hear you are relatively reduced.
How does WSPR work?
You need a PC and an amateur radio transmitter to send WSPR signals.
You need to connect the sound card input of your PC to the microphone/headphone input of your transmitter so that the WSPR software can send its data using your transmitter. Naturally, you must also have an antenna system tuned to the band you have chosen.
The WSJT-X program written by Joe Taylor,K1JT runs on your PC. Along with WSPR, this program also supports and decodes FT4, FT8, JT9, JT65, QRA64, ISCAT, MSK14MSK144 digital protocols.
To deal with or learn more about the WSJT-X software, I suggest you visit the link below.
WSPR
While some of the amateur radios in the world are sending with WSPR qrp transmitters, others are trying to listen to digital protocols such as WSPR by connecting their amateur radios with the WSJT-X program and their PCs.
These receive and send groups are recorded in a database by the wsprnet.org site and allow us amateur radio operators to access and review the WSPR signals we send or receive on this site.
The WSPR data listened and decoded using the WSJT-X program is automatically transferred and saved to the wsprnet.org site over the internet connection of the computer on which WSJT-X is running. Each record is called a SPOT.

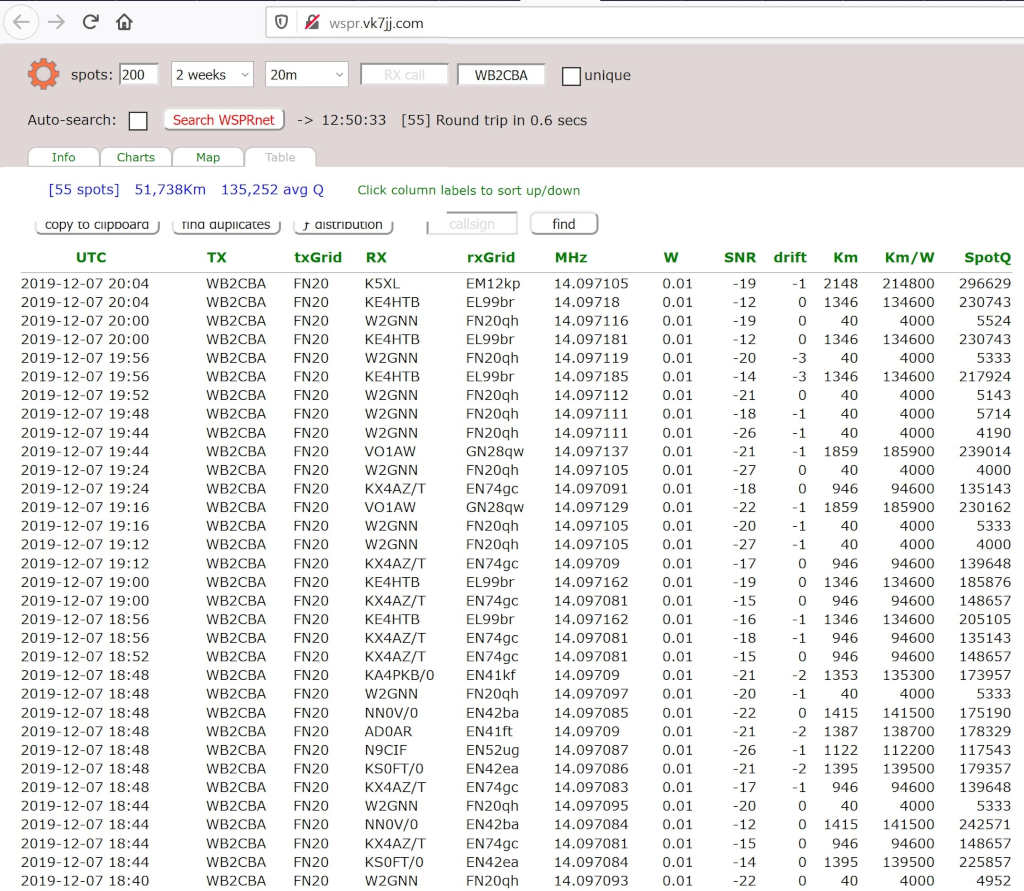
As an example of a SPOT above, let’s examine a QSO of the YM2KA ANTRAK 200 mw WSPR transmitter recorded in the WSPRnet.org database.
The first column is UTC, the date and time the shipment was received.
2nd column TX Sending station ie YM2KA
If the third column is txGrid, it is the location of the maidenhead grid locator (for Ankara, this data is KM69). Maidenhead Grid location- If you want to learn more with Maidenhead geolocation system: https://en.wikipedia.org/wiki/Maidenhead_Locator_System
4th column RX is the call code of the receiving station.
The 5th column is the maiden head grid locator information of the station receiving the rxGrid, that is, the location it sends.
The 6th column is the frequency at which the communication is received, where 14.097184 Mhz, that is, the 20 meter band.
7th column W is the output power in watts reported by the referring station that ANTRAK Wspr has an output power of 200 mw, ie 0.2 W.
8th column SNR SNR (signal to noise ratio) of the received signal.
9th column drift is how much the signal shifts during reception. This is not common in fast communications, but since WSPR is an extremely slow communication protocol and a complete packet takes a total of 110 seconds to send, frequency drift may occur during transmission. In a sense, this shows us how stable our transmitter oscillator or PLL works.
The 10th column gives the distance of both stations to each other in Km. Here the YM2KA signal has reached 3002 km with 0.2 Watt. Here I used the parameter table from http://wspr.vk7jj.com/ as an example. Output power is shown in watts on this site. On the Wspr site, it is expressed in dBm, ie decibel meters.
11th column The Km/Watt column tells us how far we can theoretically reach based on the data received in watts.
The 12th column is SpotQ, the database SPOT registration number of the received signal.
It was very interesting so far, when I googled it and got an idea of what WSPR was. Of course, now I have to try what I learned and do at least a WSPR communication, but there is a small problem! How am I going to do this experiment sitting in an apartment in New York without my HF antenna and HF transmitter.
To begin with, I started to research how other amateur radios solve this problem practically and what they send with.
WSPR Transmitter Search
When I googled it for a WSPR transmitter, I came across three things: Silicon labs’ SI5351A direct digital frequency synthesizer, Arduino and GPS receiver! And I saw that it is possible to make a low power WSPR transmitter without the need for a PC and a whole HF radio.
With great joy, I first downloaded the Arduino WSPR programs and started to examine them.
I learned this:
1- WSPR requires an extremely stable time clock. Sensitivity should be 1 second or less and should not slip.
2- A GPS receiver is needed to determine the Maiden Head Grid locator data, that is, the location I am sending.
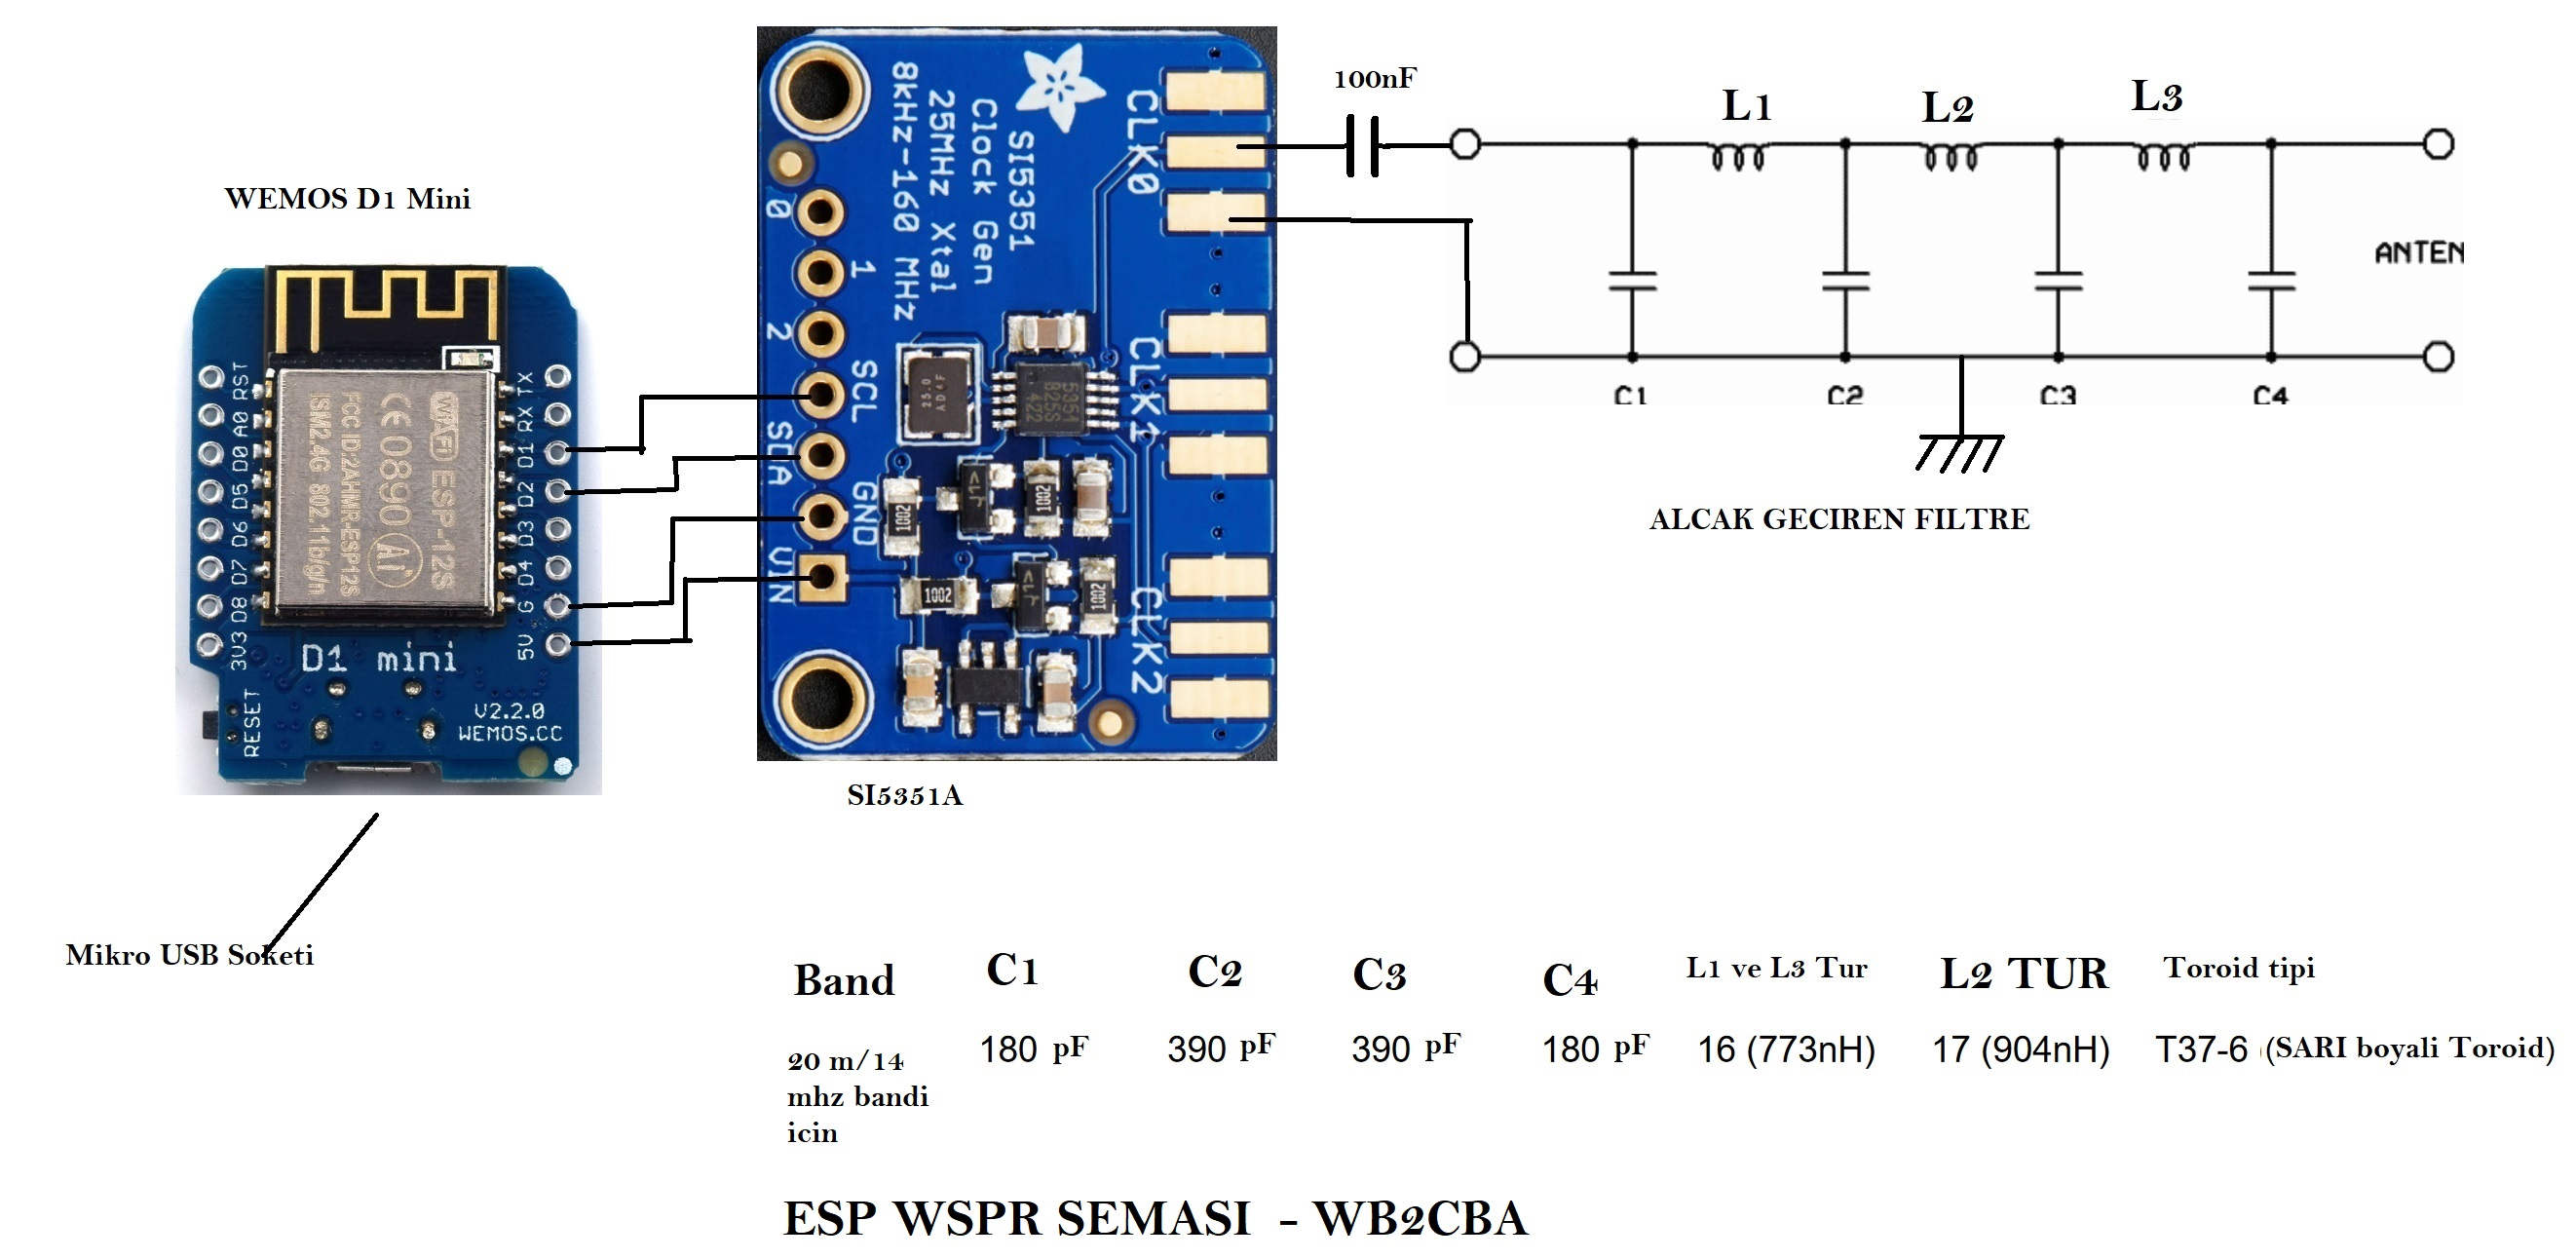
3- Since the SI5351A output is a square wave, it produces lots of harmonics. To suppress this and convert the signal to a sine output signal, all amateur radios have used a 7-point low-pass filter. Anyone who knows me knows that my least favorite element in life is the coil! This part scared me the most.
WSPR Working Technique
Now let’s examine the working technique of WSPR. WSPR data consists of three main pieces of information. Call sign, location, power. The call sign cannot exceed 6 characters in total. The first four characters of the Maiden Head Grid Locator data are used for the location. This gives us a position in an area of 100 square kilometers. Power is sent in dBm, so all sent information is a 50-bit string.
Your output power can be up to 5 watts. WSPR is a very slow communication protocol. The transmission speed is 1.46bps and it takes about 110 seconds to send all the data.
Each WSPR transmitter and receiver starts transmitting at the beginning of the even-numbered minute and finishes transmitting after 110 seconds. This time synchronization ensures that the start and end of each SPOT is synchronized with the transmitters and receivers.
Of course, I don’t want to go into too much detail here. If you want to learn more about the protocol of WSPR data communication, I recommend the following site.
http://physics.princeton.edu/pulsar/K1JT/doc/WSPR/WSPR-main.html
In the light of the information above and the information on Google, an amateur radio operator in New York with only a Class C, VHF and UHF license, living in an apartment surrounded by multi-storey buildings in the city, unable to erect an antenna (no permission), not HF device, but not enough to use the license. I’ve been trying to build a portable WSPR transmitter! Come on good luck!
ANTRAK WSPR Transmitter
By the way, during my visit to Turkey and Antrak in October 2019, we had a lot of trouble with my dear TA3AS Serdar Ulukonakcı while operating the WSPR transmitter, the ready kit I took for Antrak. We had GPS crash issues although the transmitter worked fine. In cases where the GPS signal was not well received, both time synchronization and location information were confused and the transmitter could not transmit. In short, GPS should have seen the sky directly.
On the way back, I thought a lot about this GPS issue. The most important element of the GPS WSPR transmitter. GPS has two important tasks. The first is a very precise time oscillator, as it uses the atomic clock on satellites. The second is the element that takes the location data and enables the Arduino to generate the Maiden head grid locator location information corresponding to the location. But how will this GPS work precisely when I am surrounded by towers on my apartment floor? I couldn’t solve this problem.
ESP8266 and NTP(Network Time Protocol) Servers:
ESP8266 is a module produced by Espressif company with all wifi protocol and ARM processor.
https://www.espressif.com/en/products/hardware/esp8266ex/overview
With this module, you can connect to your WIFI router and communicate over the internet.
Where did this come from, I hear you say!
I met ESP8266 in about 2015 and until today I have been dealing with a mock wifi control and sensor application using this module. The best part is that any program you run with Arduino can also run on this module.
This module and the WSPR transmitter have two features in common:
First, you can access time servers on the internet with this module. Thus, you can keep the time clock in the ESP8266 as accurate as you want. There is a mock NTP server on the Internet. NTP – Network Time Protocol – servers are used to synchronize time between networks with very precise atomic clocks.
WSPR requires very precise time synchronization in its transmitter.
Secondly, WSPR transmitter programs are mostly written in Arduino. The ESP8266 can also be programmed with the Arduino ide.
This was what the Americans call the “eureka moment”, the moment when my light bulb went on. If I use ESP8266 and NTP server, I could theoretically send WSPR data from wherever I sit over wifi without needing GPS!
Of course, I have to deal with two important problems in order to go up in the air.
1- Obtaining a general license. That is, moving from class C to class A.
2- Obtaining an antenna (!), which is the most important problem, where do I install the antenna? Anyway, my aim was to leave this problem for last and make the circuit first and run it under laboratory conditions.
ESP WSPR:
Thus, I started my new curiosity and adventure, that is, the new monkey, with the phrase ANTRAK. First of all I got a SI5351A module which is available at www.aliexpress.com for quite cheap . There are even www.direnc.net and www.N11.com in Turkey. for about $5.
I had the WEMOS D1 mini module in the ESP8266 and I used it. The WEMOS D1 mini module can also be obtained from www.aliexpress.com or the sites in Turkey that I wrote above. Any ESP8266 NODEMCU module can also be used.
Of course, the most troublesome part of the job is that you have been dealing with digital all your amateur radio life and winding a toroid coil and making a low-pass filter!
Anyway, I said we will think about it last and drew the diagram of the circuit:
The best part of working with Arduino is that if you want to use an integrated or module and this is popular among amateurs, you can find a whole world of libraries on the internet. When there is a library, combining the gaps and writing a program is, as I say, cut-copy-paste programming!
I love dealing with Arduino because of this CUT-COPY-PASTE philosophy, compared to the days when I spent many years programming on PIC processors and writing my own library for each integration. At least I’m getting more sleep.
SI5351A libraries
As a first job, I found the SI5351A libraries and added them to the Arduino.
https://github.com/etherkit/Si5351Arduino
The SI5351A Arduino library I use is written by NT7S Jason Mildrum and generally all Arduino WSPR transmitters use this library.
I started to set up the circuit in the perforated pertinax. Of course we hit a rock in the Low-pass filter. I found QRP Labs after an internet search.
https://www.qrp-labs.com/lpfkit.html
Interestingly, QRP Labs belongs to a British amateur radio operator living in Muğla Dalyan, Turkey.
I used the filter details here. I even ordered a 14 mhz and a 28 mhz filter.
I chose the 20 meters/14 Mhz band. I chose this because the antenna size is relatively smaller, but the propagation conditions are better compared to higher frequency bands.
Finally, I wrapped my first low pass filter and assembled the circuit:
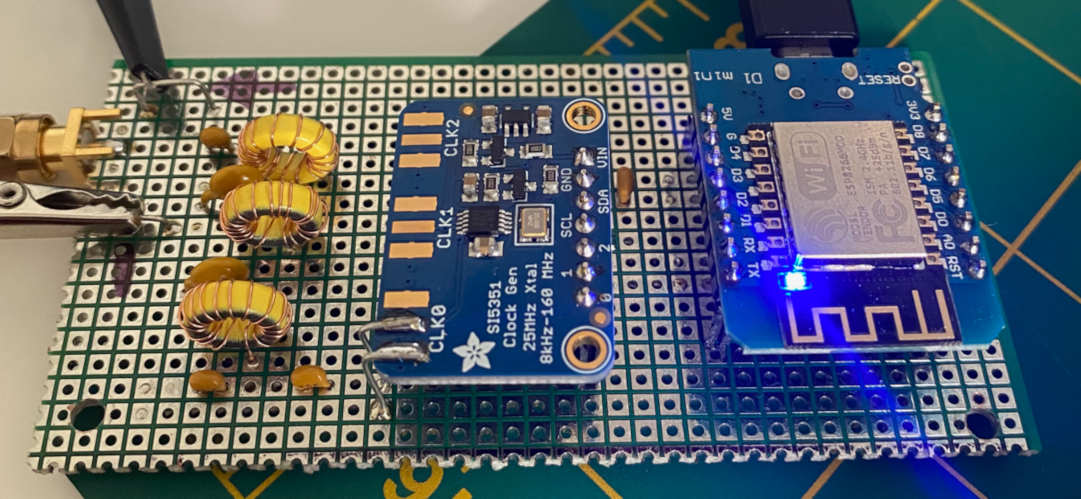
Toroidal coils are type T37-6 from AMIDON. L1 and L3 coils 16 turns of 0.30 mm wire. The L2 coil is 17 turns of 0.30 mm wire. Wire diameter is not so critical. I saw that this toroid coil job is not very difficult. Not as much as I feared.
Toroid details are in the link below:
http://www.amidoncorp.com/t37-6/
At first, I wanted to download a simple program and see the signal output with an oscilloscope at 14 mhz.
First, I checked if the SI5351 is working with a simple Arduino program. Of course, this program is also a way to see if the low-pass filter is working.
I chose the middle of the WSPR 20 meter band as the frequency. 14.097100 Mhz. WSPR bandwidth is up to 6 hz. The whole band is 200hz. Frequency stability needs to be good. SI 5351 A is a very good integrated from this point of view. Of course, it slips in extreme cold or heat, since TCXO is not used in these cheap Chinese-made modules. Generally not bad.
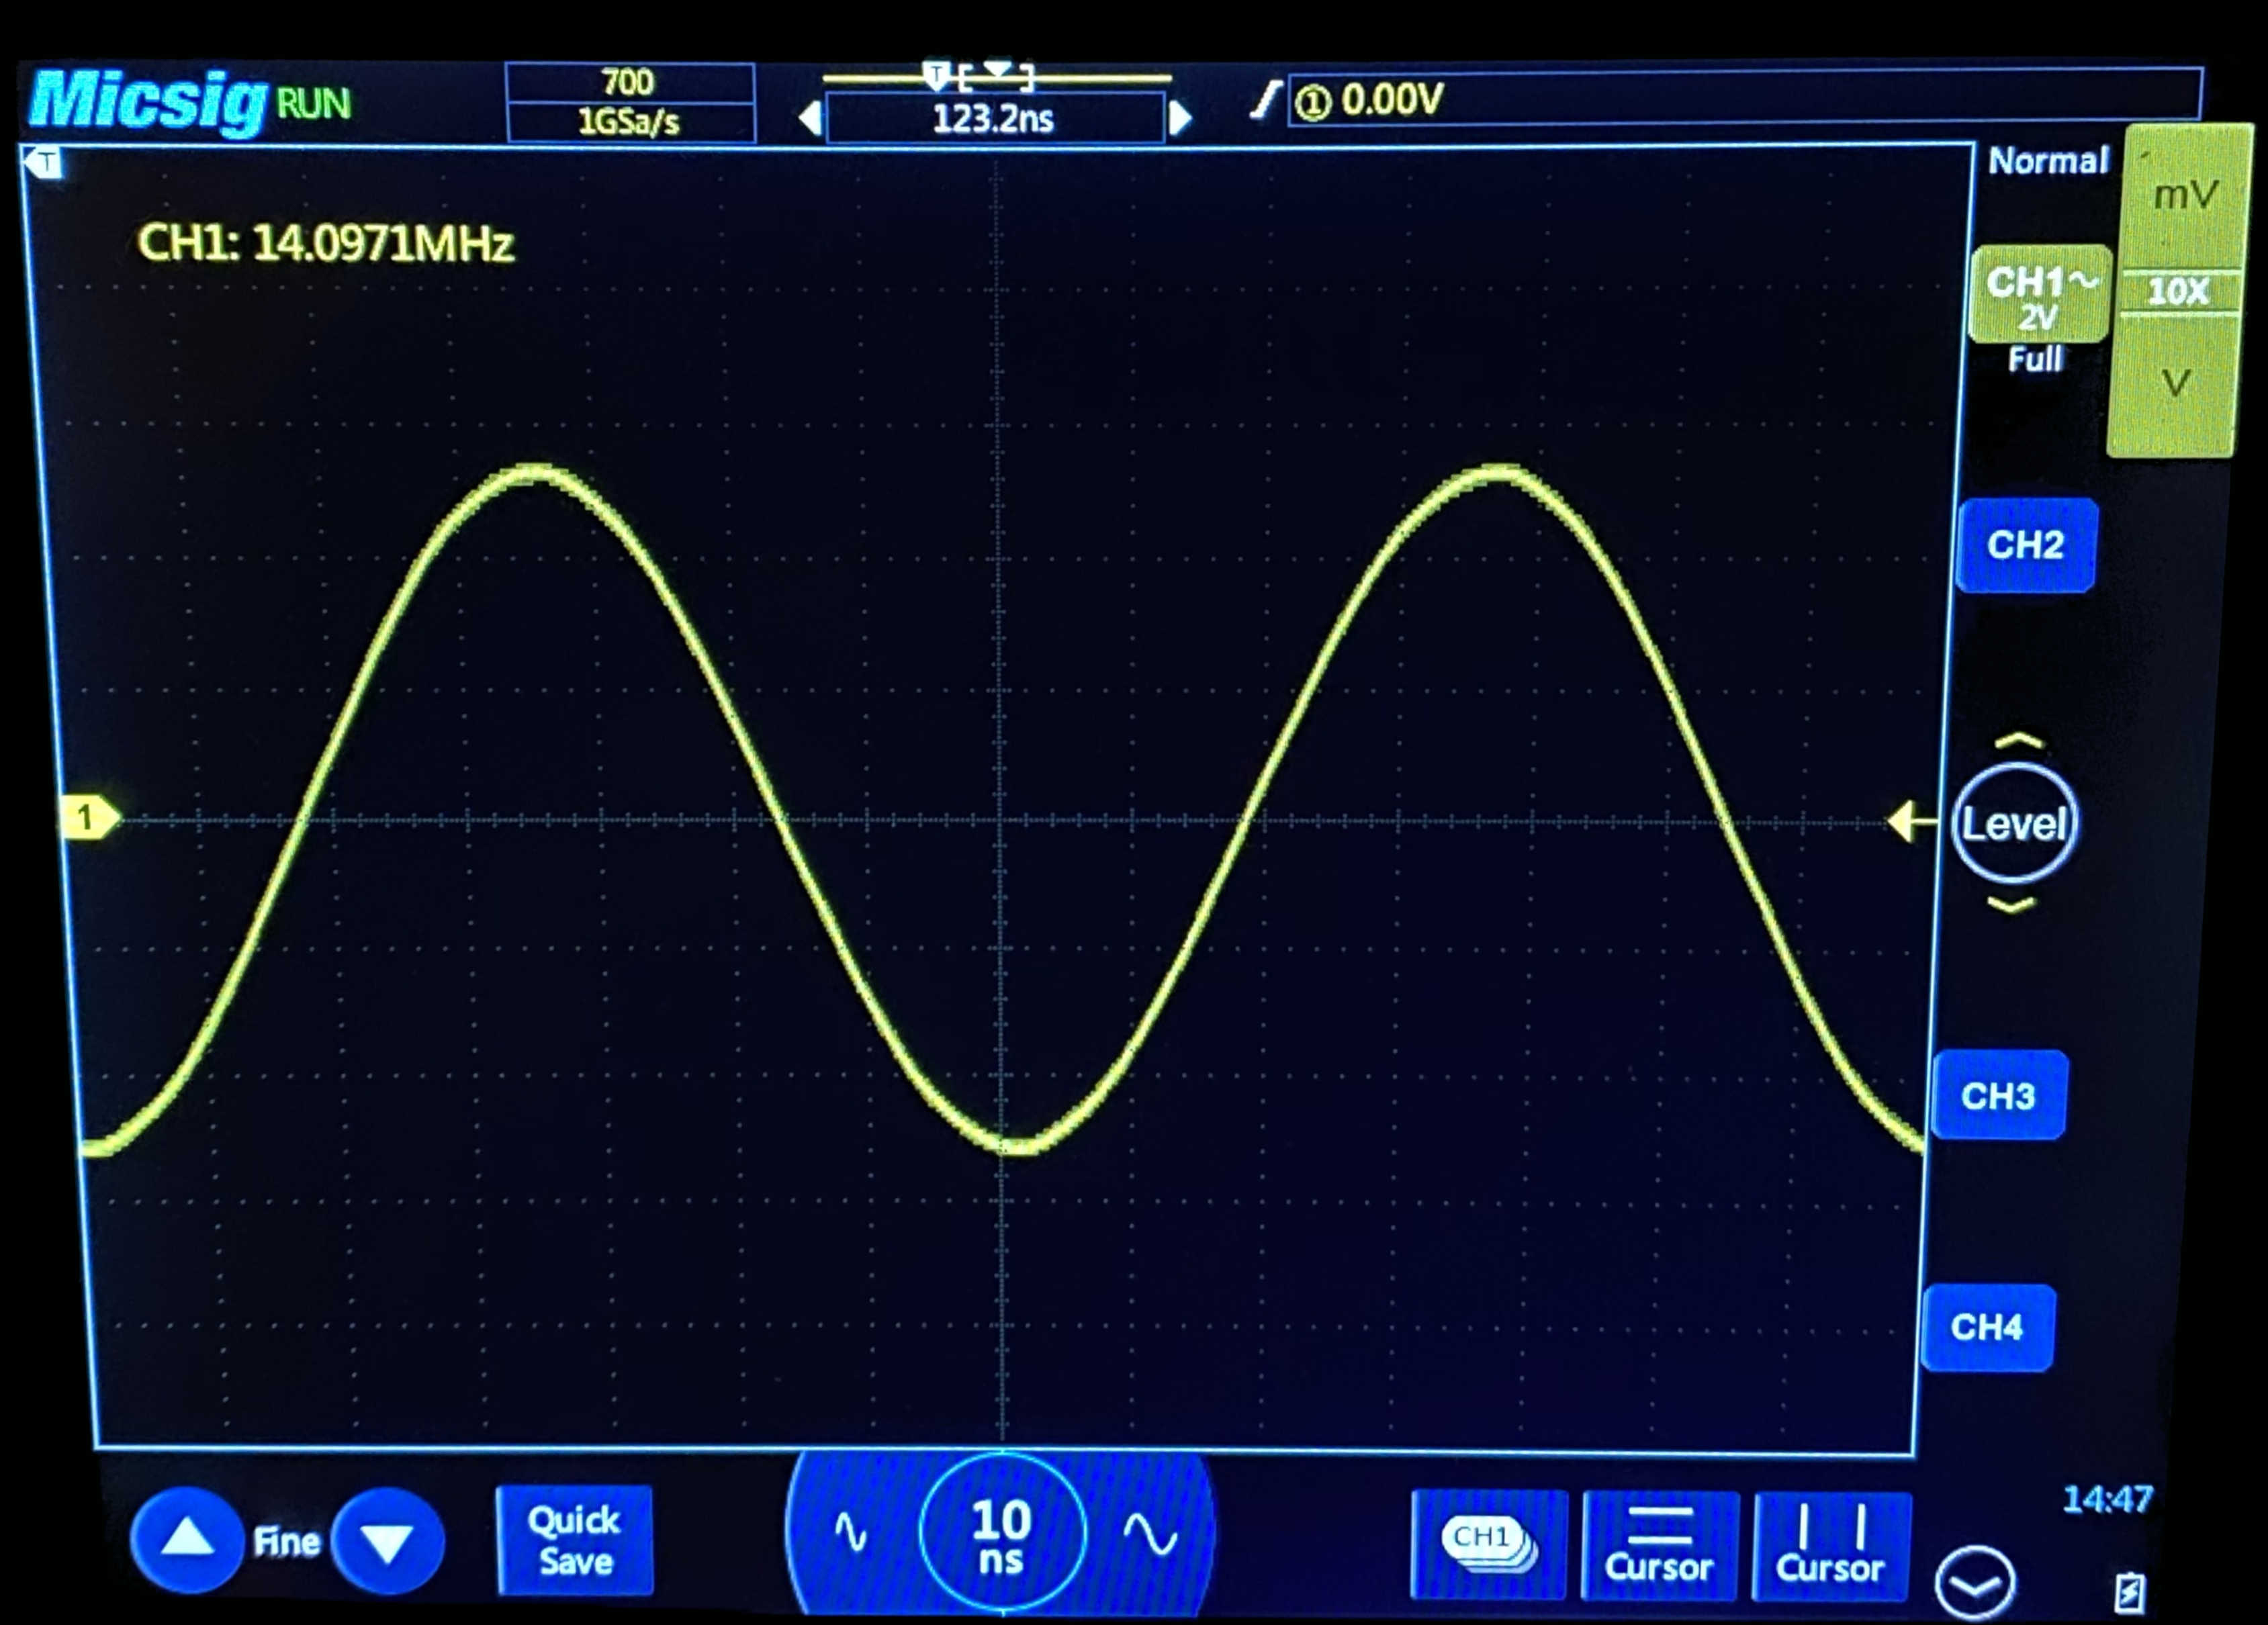
As seen on the oscilloscope, the signal output is a satisfactory sine wave.
So the first and most important part, the signal generation and the low-pass filter test, was over.
a giant step
A small step for amateur radio, but a big step for me, who has never done a low pass filter in my life!
Then again, the research began on Google. This time I went on the hunt for Arduino code written for ESP8266 and WSPR. And I found one. The Arduino program, written by Italian amateur radio IW5EJM Marco, did almost everything I wanted. I can’t thank Marco enough. I took this software and adapted it with my cut-paste-copy programming and it worked! The software could connect to the wifi router at home and receive the NTP server data and send the WSPR signals in the perfect 20 m/14 mhz band. Of course, 50 ohm dummy load instead of antenna!
Now it was time to try, that is, to go up in the air, and the problems started at this point.
Amateur Radio License
First of all, I have to take the American General Amateur License to be able to post in the 20 meter band. Anyway, I passed this exam by studying for a few nights.
The first hurdle had been lifted. Now there was the most important obstacle, the antenna. I have two options for the antenna: I will either buy a mobile antenna and magnetize it to the top of my car and send it from my car, or I will make a magnetic loop antenna and send the WSPR signal from the park in front of the door, from the house, etc.
I Got Help from an Amateur Radio Friend
My amateur radio friend, Çağlar Akgüngör, KD2RCP built this magnetic loop antenna very successfully and we did the first trials with him from his Astoria Queens NY apartment floor with his call sign and we reached the state of Alabama, 2000 kilometers away, from the kitchen of the apartment.
At that time, I had not yet upgraded my license to Class A, that is, General. Now, when I got my license, I started the antenna search and decided on the mobile 14 mhz whip antenna. I used this antenna as the antenna.
QSO with Mobile Antenna
https://www.ebay.com/itm/AMPRO-20-Metre-14-MHz-HF-MOBILE-ANTENNA-/222290748856
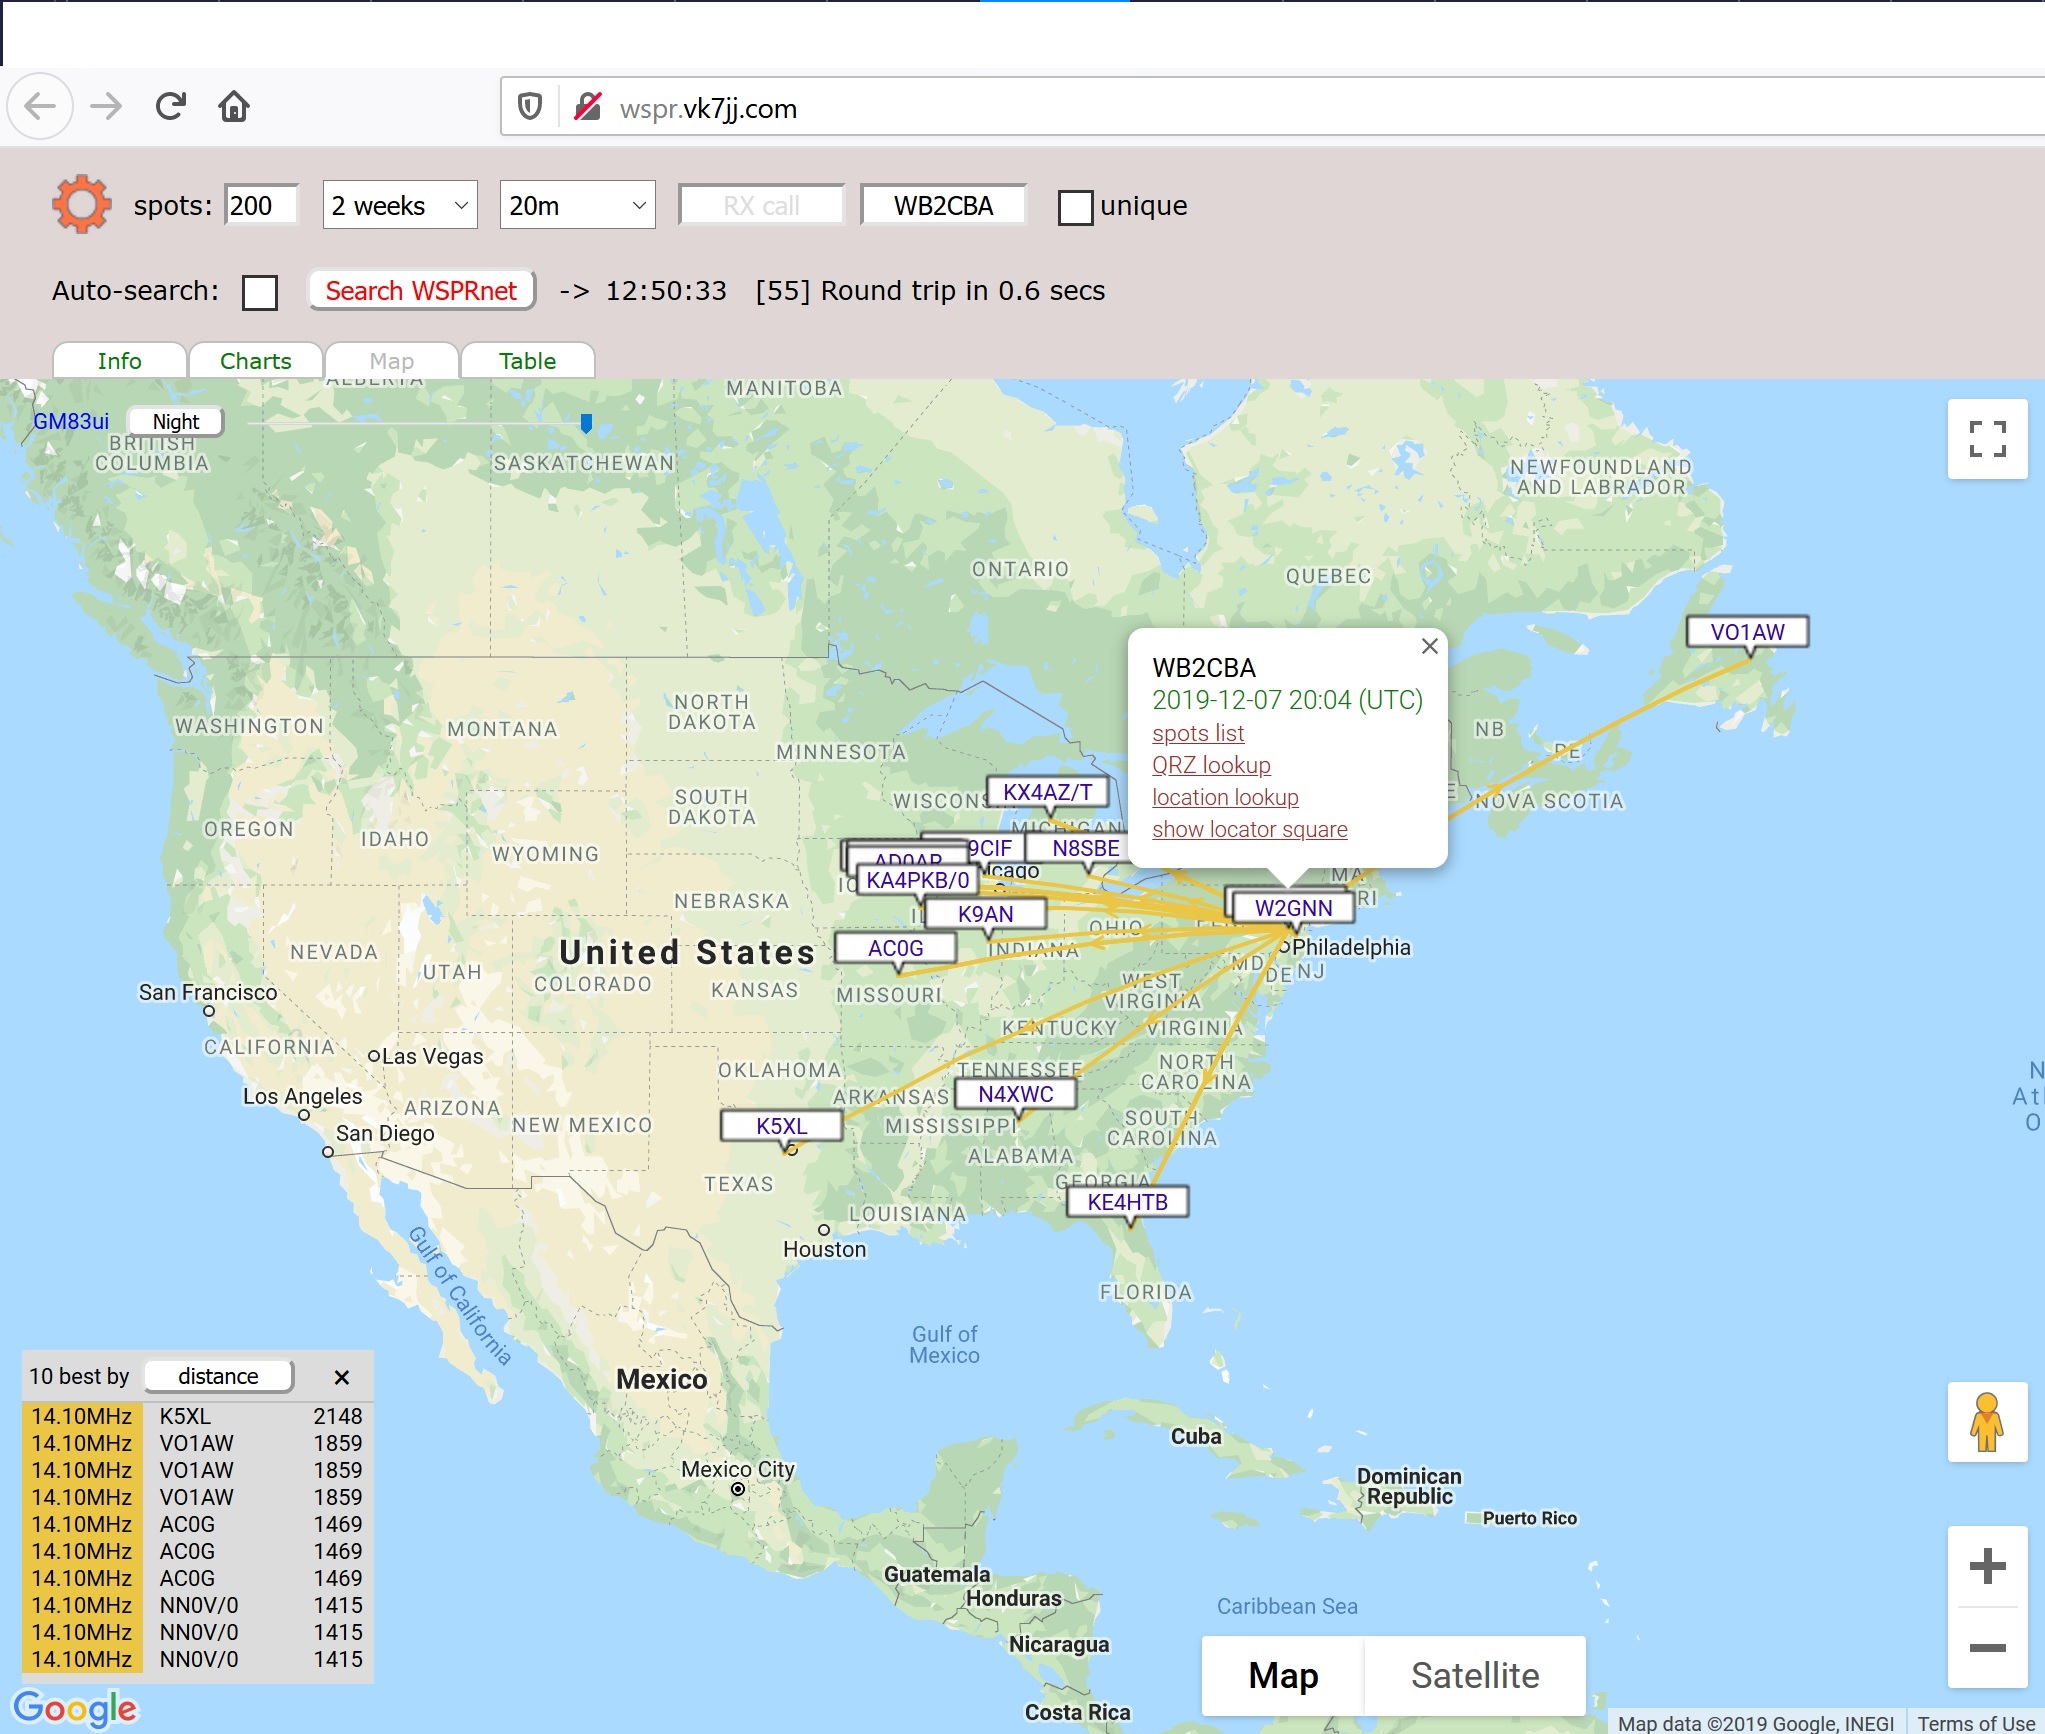
Creating a portable mobile station with a Saturday whip antenna and ESP_WSPR with my own callsign in a New Jersey park I made my first attempt at ESP_WSPR. I made the WIFI connection using my phone as WIFI hotspot. When I saw the results and the locations I reached, my mind stopped! With a 10 mW transmitter, I reached a distance of 2148 km with a mobile vertical antenna. As a 40-year-old digital electronics amateur who has never done a QSO outside the city, has always used VHF/UHF handheld radios throughout his amateur radio career and has never gone below 144 mhz, this has been a great step for me. While the transmitter is software and not me speaking, technically this is my first HF QSO with my own calling code! :)
My field day WSPR station:
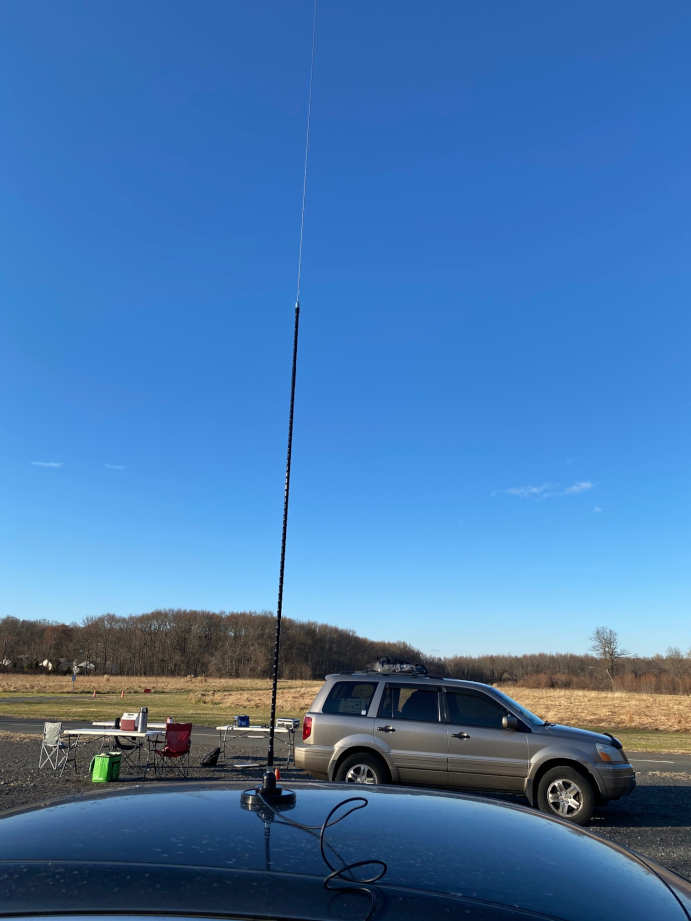
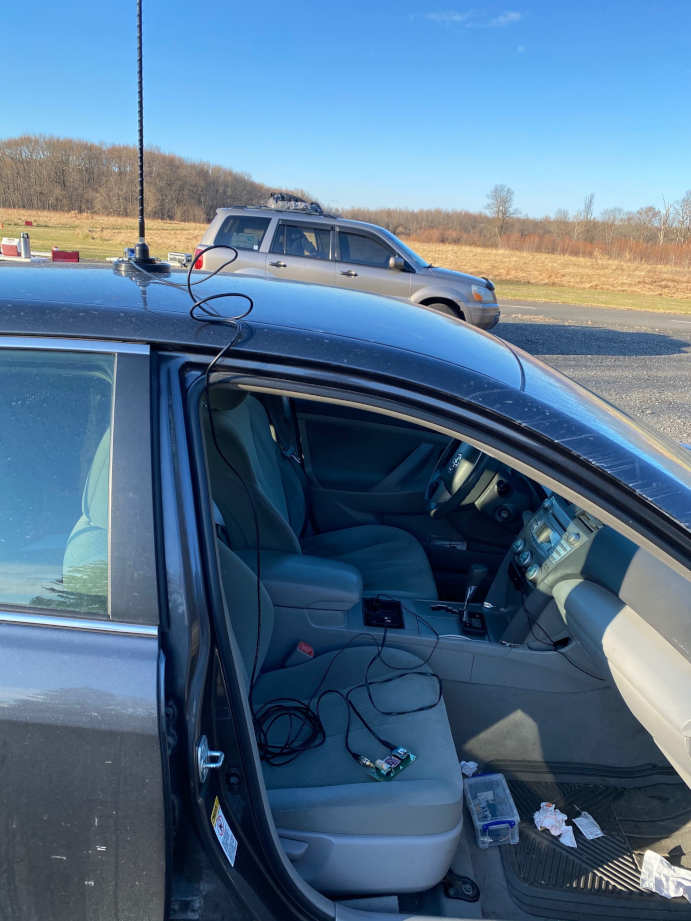
ESP_WSPR is a very efficient WSPR transmitter because it is inexpensive and does not require GPS. The software of this transmitter came together with the efforts of many amateur radio operators around the world. Especially if the IW5EJM did not have Marco’s software, it would have bothered me a lot. I cut and cut a little, copied and added. Had a couple of issues, I fixed them. I can’t thank the world amateurs who write wspr Arduino libraries and software. I personally support sharing software (open source software) wholeheartedly. Arduino is a great tool at the forefront of this philosophy.
Don’t miss the second part of this article!
In the second part of this article, I would like to explain how to program and use ESP_WSPR. Thus, I will be happy to guide amateur radio operators who want to make a WSPR transmitter with the esp8266 who shared the information.
Stay with love.
Barbaros Arusoğlu, former TA2CBA current WB2CBA, New York, USA 12/12/2019


